Meteor, React and Material UI the easy way
[UPDATE 2015-06-27] Meteor MDG is changing its skin and now they provide a Meteor + React + Material UI integration example, which is a bit different to the one suggested here.
There are technologies that are cool standalone but don’t immediatly play nice together.
material-ui-demo.meteor.com (source)
- Meteor: the fullstack web platform with data synchronization client/server (DDP)
- React: the virtual DOM UI library from Facebook
- Material UI (React): the implementation of the Material UI / Polymer components without the webcomponents part (aka the Material UI that works today)
- Babel: the the ES6/7 transpiler and the easiest way to deal with React components.
Meteor (MDG) is working actively to support officially React and Babel, but the React ecosystem uses npm/browserify as package manager, so let’s see how to integrate all together in a maintainable way(*)
Meteor + React + Material UI base
Currently the Meteor-React packages (react-packages) aren’t in the public index and the react package doesn’t run nice with Material UI package (see #11), so we'll install React via browserify and the rest a la Meteor way.
git clone https://github.com/meteor/react-packages /path/to/react-packages
export PACKAGE_DIRS=/path/to/react-packages
meteor add babel-compiler babel-runtime jsx react-meteor-data
Note:
/path/tois where you keep your local/private packages
Then we create a local package browserify-deps, to store all our browserify dependencies. It could also be useful to install react-router or others React deps.
meteor add cosmos:browserify
meteor create --package browserify-deps
// packages/browserify-deps/client.browserify.js
React = require('react');
mui = require('material-ui’);
injectTapEventPlugin = require("react-tap-event-plugin");
// packages/browserify-deps/packages.js
Package.describe({
  name: 'browserify-deps',
  version: '0.0.1',
});

Npm.depends({
  'react': '0.13.3',
  'material-ui':'0.8.0'
});

Package.onUse(function(api) {
  api.use(['cosmos:browserify@0.3.0'], 'client');
  api.addFiles(['client.browserify.js'], 'client');

  api.export('React', 'client');
  api.export('mui', 'client');
  api.export('injectTapEventPlugin', 'client');
});
And now let's install our package
meteor add browserify-deps
Our Meteor + React + Material UI is ready and we can now start coding!
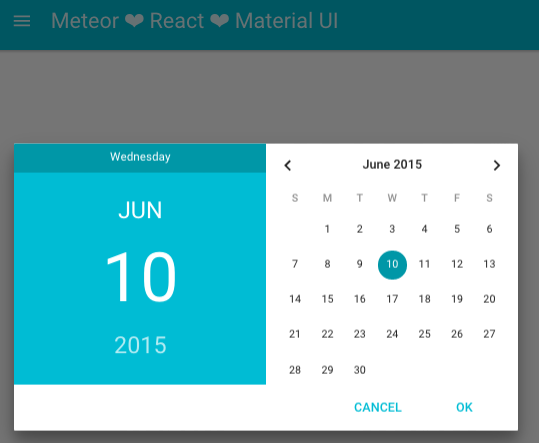
The React reactive counter with DatePicker example
Just to wire all the things together here is a minimal example
// client/Main.jsx
var {RaisedButton, DatePicker, AppBar, AppCanvas} = mui;
var ThemeManager = new mui.Styles.ThemeManager();

Main = React.createClass({
  // Required by Material UI
  childContextTypes: {
      muiTheme: React.PropTypes.object
  },
  getChildContext() {
      return {
          muiTheme: ThemeManager.getCurrentTheme()
      };
  },

  // Use `Session` or other reactive data sources ONLY
  // if you have to communicate with the rest of the Meteor stack
  componentWillMount() {
    Session.set('counter', 1 );
  },

  // Required to use Meteor reactive data sources
  mixins: [MeteorDataMixin],
  trackMeteorData(props, state) {
    // Put here your subscriptions
    return {
      counter: Session.get('counter')
    };
  },

  // react component private functions
  _reset() {
    Session.set('counter', 0 );
  },

  _increment() {
    Session.set('counter', this.data.counter + 1 );
  },

  _onChange(err, newDate) {
      console.log(newDate);
  },

  // We can customize the internal format date. Default is mm/dd/yyyy
  _dateFormat(date) {
    var m = date.getMonth() + 1;
    var d = date.getDate();
    var y = date.getFullYear();
    return `${d}-${m}-${y}`;
  },

  render: function() {
    var styles = {
      paddingTop: '200px', textAlign:'center'
    }

    return (
      <AppCanvas>
        <AppBar title='Meteor ❤ React ❤ Material UI' iconClassNameRight="muidocs-icon-navigation-expand-more"/>
        <div className="spacer" style={styles}>
          <RaisedButton label={this.data.counter+" +1" } primary={true} onTouchTap={this._increment} />
          <RaisedButton label="reset" primary={false} onTouchTap={this._reset} />
          <DatePicker hintText="I'm a DatePicker try me!!" mode="portrait" formatDate={this._dateFormat}
                      onChange={this._onChange} />
        </div>
      </AppCanvas>
    );
  }

});
We don't use any router in this example so, let's attach the react component when Meteor is ready.
// client/startup.jsx
Meteor.startup(function () {
  // Required by Material UI http://material-ui.com/#/get-started
  injectTapEventPlugin();
  // React component mounted in the DOM
  React.render(<Main />, document.body);
});
If you want to learn more about React, Meteor, Material UI, I raccomand the todo example with React, Meteor and react-router (source, the demo todo with Material UI (demo, source) and the TodoMVC with grigio:babel and grove:react (demo, source).
As you can see there are many ways to integrate Meteor + React, and the cosmos:browserify way (source) is very interesting because do not embeds source code in your project but link directly the mainstream releases.
What do you think? Discuss on crater.io
(*) With this approch the React library included is not the one minified by FB.